Showing posts with label Before and after pictures. Show all posts

Saturday, February 2, 2019

A Cottage Kitchen!

You guys this post is a long time in coming...but Ta Da! Kitchen fitted!  Here is a quick kitchen recap...
I don't miss this nightmare 'kitchen' at all... no storage, questionable electrics, sink that didn't drain, or alternately leaked onto an outlet that was for some reason installed underneath of it.. 
Mr.F stripped everything out of the kitchen, and I mean everything.  He started from scratch to create a dry and level base for the stone floors!
I was lucky that I didn't have to live here during the installation even though it went much more smoothly than the bathroom renovation catastrophes, feel the pain here and here.
Fun kitchen deliveries!
We decided to have the kitchen professionally fitted, which came with its own ups and downs but now that its in and we've lived with it for a while (a year, yes that is how long it takes me to get around to blogging.)  I'm already thinking about how to tweak it.. mostly just fun stuff like shiny brass handles and painting the cabinets. 
Waiting for installation!
 The cabinets are primed white, and originally I thought white and bright was the way to go, but it shows everything and I've really been feeling the deep jewel tones in decorating lately.  So maybe a deep ruby red or a sumptuous dark plum paint color is on the horizon..
What color would you choose?
We went for lots of classic cottage kitchen features like the farmhouse sink, the breakfast bar, and butcher block counter-tops.  The counters are a beautiful light Maple, a material traditional to Victorian kitchens, I love them but I'm not sure I'd do it again.  The Maple stains easily so we have to be careful to always wipe dry spills, in fact its probably time to oil them again.. add it to my list.  
The scene of frequent cooking shows staring myself.  
Check out those gorgeous backslash tiles we had exactly the right number left over from tiling the bathroom.

Ok so, what color would you paint the cabinets?

-Nikki


Thursday, June 21, 2018

Watching Paint Dry

I've been in the UK about three weeks now and I've settled in somewhat.  The studio is now completely painted with Cat's Cradle (Earthborn Claypaints) on the walls and Off-Black Estate Eggshell (Farrow and Ball) on all the trim.  I even painted the inside of the little closet over the stairs and picked up some classic clear storage containers to organize it.  
I also finally had a chance to clean the paint off of both sides of this little transom window!  Now even if all the doors are closed the hallway gets some natural light, a welcome change!
 
I love this little room and I can't wait to see it carpeted, which, SURPRISE we are going with wall-to-wall carpet in the studio, the front bedroom, the hall, and the stairs.  We attempted to revive the floorboards but they are just in horrible condition and at this point we really just want the space to feel finished and cozy. 
Next I used Farrow and Ball's Off-Black downstairs on all the new baseboards.  All through the lounge, hall, kitchen and dinning space, we have brand new baseboards (because of the new floor.)  All the screw holes (huge masonry screws) had to be filled and sanded, then a wood primer coat and two coats of Off-Black.  All this took the better part of 3 days.  Long days spent home alone; on the floor, listening to true crime podcasts, I went a little stir crazy.  

I'm so in love with the way it came out, the soft black feels sophisticated and elevates the color of the limestone floors in a way I did not expect.  I'm not 100% happy with my fill job though, when the screw holes were on the curved section of the trim, it was a real struggle to get a seamless fill (whos idea was that!?)

I used Farrow and Ball's Railings for the baseboards in the front bedroom (no pictures of that room yet!), this one is a deep blue-black, though it just feels black in there, maybe that will change once the carpet goes in.

I also painted the woodwork going down into the cellar.  Previously the spookiest space in the house, it is now tidied up and a little more welcoming.  I only had enough paint to do the one wall, but after I added new light bulbs, it made a world of difference.  My next job down there will be to get some new shelving.  I need a place to store all these cans of paint!

Finally, I threw paint at the outer garden gate, it is a POS but the paint helps a little and is a step towards the garden not looking abandoned!

In wedding news: We picked up the succulent favors!  They are cute and now I don't want to give them away...

-Nikki

Tuesday, March 14, 2017

Stone floors!

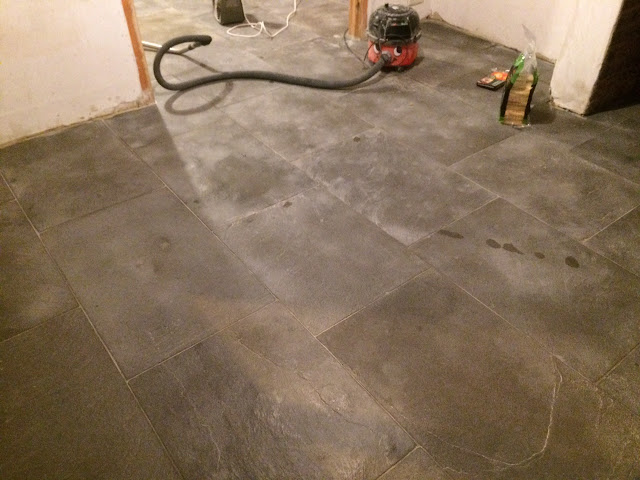
The downstairs floors have been re-done and they are looking very lovely.  Under the linoleum we had an uneven concrete slab and quarry tiles, all of which was sitting on dirt and rubble.
Matt had to do a lot of digging out to safely remove all the bad old stuff and prepare for laying in the new sub-floor.  
They dug down to dirt, literally, that is a dirt floor in the kitchen, and living room.. and dining room... But soon enough things started going back in to construct the new sub-floor.
The new sub-floor consists of layers of foam glass insulation with limecrete on top meant to be vapor permeable.  It was fun for me to see these progress shots each evening.. especially because I wasn't living in it.
The whole process took them several days, but resulted in a gorgeously level new floor which should also help stop the rising damp from destroying our plaster walls, because at the same time as all this flooring fun...
...Most of the downstairs plaster was being redone.  To deal with that same rising damp issue, the bottom half of the walls had to be demo'd and re-plastered. I was very glad to not be around for all this, I know the disorder would have made me go a little mad.
The stone for the new floors is an Aged-Heritage-Limestone and before deciding we looked at several other samples.  Naturally I spent an entire afternoon moving the samples around to different rooms to see how they would look.  Below you can see my three samples, the linoleum we started with, as well as the ugly hearth stone, and the partially hidden mess that is the old cracked tile under the old wood burner.
I had this vision of bright whites/ivories everywhere in the house, but in the end I was won over by the ripples and texture of the gray limestone.  They look something like river stones and what I really like is the fact that they are common around Tewksbury.  Once I started looking I saw the texture and color used in several other old buildings and on some of the sidewalks!  
We are still trying to decide how to seal it though, the options are a 'wet-look' or a 'dry-look'.  Above it is dry (very natural, maybe a dusted look to it) and below is right after mopping (slightly glossy, shiny).  Which would you choose?
If you compare this photo of the finished stone floor in the kitchen to the earlier process photos of the same space you can really see how far we've come!
Now the downstairs is nearly finished structurally and a post on the kitchen is coming soon.  Walls have been whitewashed, the furniture moved back into the space, and I've been obsessing over rugs.  Now, final flooring thought this week, check out my new Kilim area rug!
Thank you Ebay for existing!  This is a colorful over-sized beauty from the 1940's all the way from Istanbul and I am so in love.  It currently is living with me in Maryland, but I can't wait to see it against those stones in the cottage! One side is very faded for a more muted look and the other is still incredibly vibrant.

- Nikki

Monday, October 3, 2016

DIY Padded Headboard. -Very simple!


I know I haven't posted in a while, life has been very busy with job changes and traveling, so here is a short one to get back in the groove.  
A room decor project, for the beach condo, completed this summer with some help from my sister, who I might add has been even more busy than I, starting her Ph.d program.  I'd always wanted to try diy padded headboards and used the mismatched existing headboards as an excuse.  The goal was to update them and make them match along with the other decor. 
Finished product first! Bananas for scale!
~
These are the headboards I started with.
I attacked this project just like I was recovering a set of chairs, using some egg-crate mattress pads and left over fabric from the sofa makeover.
We measured and cut the materials to size then stapled on.  This is where my sister Cat was a huge help, taking turns to hold the layers of padding or fabric in place and stapling (and taking photos!). We wanted a smooth front so all the material was cut large enough to reach around to the back of the headboards and was secured there out of sight.  To secure the fabric and padding we used a staple gun (pictured) and a hammer to drive them in properly.

The corners were the only tricky part, but we tried a few folding combos until we achieved a neat look.  
A few hours, and a pizza, later we were finished!
Thats it, now the headboards match and are very comfy to sit up and read against. Next time I would try tufting them by pre-drilling holes in the headboards to string covered buttons to for a more upscale look. 
- Nikki


Friday, May 27, 2016

Sofa rehab - DIY

My parent's beach condo came with a plethora of white wicker furniture and pastel floral cushions.  We are in the process of redecorating, in a neutral modern theme, so mom gave me the go ahead to try and tone down the sofa.  I couldn't make things much worse and I know they plan to replace the old couches eventually so I channeled our gray theme and experimented a bit.
Before! 
I decided I would dye the cushions, since the covers are removable, and cover the rest of the fabric with something neutral from the fabric store. The first step was to remove all the cushion covers and put them through a hot wash.
I then used a handy tip from Threads Magazine ID fabrics with a burn test for determining the type of material, since the tags were long gone, I pulled some loose threads from an inside seam and held them to a lit match.  Using the handy chart which describes how different materials will react to the flame I was able to determine that the fabric was most likely cotton, rather than a synthetic.  This is important because the dye bath requires differing additives depending on the fabric type to help the dye set, in this case, salt. 
I've dyed clothing before so I felt pretty comfortable choosing black dye with the aim of reaching a dark gray.  I had over 16 lbs of fabric to dye in a stock pot on the stove (I didn't want to risk ruining the washing machine) so it took all afternoon.  
After soaking in the dye bath the covers got another wash to remove any traces of loose dye, don't want that rubbing off when we nap on it, and then I spent about an hour repairing some split seams and little holes.  They actually weren't in bad shape for their age, and we suspect they are from the 80's when the condo was built. 
The dye worked out as a dark gray, mottled over the pattern, so the pastels were toned down a bit and I'm trying to spin it as a positive... the pattern showing through means any stains will be easily disguised. 
For the parts of the sofa I couldn't remove and dye I decided to recover them, I headed to Jo-Ann fabrics with a few of the dyed covers to find a simple fabric to match.  I ended up buying 15 yards of a very plain neutral gray cotton, it was on sale too!  I rounded up on all my measurements and purchased a bit extra too, figuring that what I didn't use would go to other projects around the condo, working towards some continuity in the space.  
The back, sides, and footer portions of the sofa all had that same tropical pastel fabric which had been stapled on, I decided to run with that and just stapled my gray fabric over the original.  The large backrest section was simple, just cutting to size, pulling strait and staple to the frame underneath and out of sight.  for the sides and footer there was a bit more finagling because the fabric was originally attached before the sofas were assembled and I wasn't able to take them a part in this case.  In order to get a clean look I used a flat Spackle edge tool to wedge the edge of the fabric in to the gap very tight, and stapled where I could, I wanted to avoid visible staples as much as possible, to mimic a professional look. 
The fabric seems to be wedged tightly enough that it will stay in place, but if it does come loose I'll just wedge it back in and secure it with a line of glue.  
This project was bigger than I had expected it to be, but the result is an improvement in my opinion, not great... but better and I learned some lessons.  In the future If I am thinking about reupholstering something I'll see if the arms are removable or something, that would have gone a ways towards speeding up this project, rather than trying to slide and thread pieces of fabric through the wicker.
Against the new light gray walls I think this is a definite improvement over the pastels.  The whole project cost about $70, including all the dye and fabric and took about 10 hours (and I have lots of extra cloth!)  I would definitely attempt this sort of thing again.  Depending on the piece I'd be willing to shell out for a higher quality fabric as well, proper upholstery, something more durable and dynamic.  
Plus I got a free trip to the beach out of it!
- Nikki


Wednesday, April 6, 2016

Dresser Makeover - Experimenting with bleach.

Remember this little chest of drawers from the Friday findings?  Well, it got a make over, the goal was to update the look for a fresh clean natural finish.  Read on to find out how!

Wednesday, March 23, 2016

Furniture rehab! - Vintage Accent Table

My mom has had this table for years, it is not in the best shape, and since my parents recently got a beach place they are gathering up things to furnish it with.  So in keeping with the bright and airy feel of the condo (condo before and afters coming soon) I wanted to clean this up and lighten the color.  
Before Picture...

Monday, February 22, 2016