Showing posts with label DIY. Show all posts

Thursday, January 30, 2020

DIY Gold-leaf Agate Bookends

I think I get bogged down trying to do blog posts that cover the grand scale renovation projects and thats why it takes ages for me to publish them.  I'm always editing them down trying to be sleeker, less-wordy, more sophisticated, to generate some idealized version of myself to put out there.  Well news flash: thats not how I am, in real life I'm verbose, project oriented, and tenacious about the little details.  ANYWAY here I made you this thing. 
DIY Gold-leaf Agate Bookends.
Its exactly what it sounds like.  I've always been a collector of pebbles, shells, and curios, so when I saw Agate slice bookends showing up a few years ago I knew I wanted a pair.  I prowled my favorite thrift stores back in Maryland until this lovely natural pair popped up for only a few dollars!

They needed a little more glam to lift them from ordinary to extraordinary so gold it was.
I forgot to take a photo before I started the project..blogger fail, but basically the outside edges were just plain stone.  First I taped off the cut sides with quality blue painters tape, you don't want to risk edge bleeds here.
I went for quality metallic gold spray paint from Rust-oleum, I've had mixed results attempting to give a metallic finish to smooth items in the past, (plastic or stainless steel) but on a rough surface like rock it works quite well.
Let the paint dry, I recommend two thin coats, then peal the tape off of the cut edges and you're all set!
My assistant..


-Nikki

Thursday, June 21, 2018

Watching Paint Dry

I've been in the UK about three weeks now and I've settled in somewhat.  The studio is now completely painted with Cat's Cradle (Earthborn Claypaints) on the walls and Off-Black Estate Eggshell (Farrow and Ball) on all the trim.  I even painted the inside of the little closet over the stairs and picked up some classic clear storage containers to organize it.  
I also finally had a chance to clean the paint off of both sides of this little transom window!  Now even if all the doors are closed the hallway gets some natural light, a welcome change!
 
I love this little room and I can't wait to see it carpeted, which, SURPRISE we are going with wall-to-wall carpet in the studio, the front bedroom, the hall, and the stairs.  We attempted to revive the floorboards but they are just in horrible condition and at this point we really just want the space to feel finished and cozy. 
Next I used Farrow and Ball's Off-Black downstairs on all the new baseboards.  All through the lounge, hall, kitchen and dinning space, we have brand new baseboards (because of the new floor.)  All the screw holes (huge masonry screws) had to be filled and sanded, then a wood primer coat and two coats of Off-Black.  All this took the better part of 3 days.  Long days spent home alone; on the floor, listening to true crime podcasts, I went a little stir crazy.  

I'm so in love with the way it came out, the soft black feels sophisticated and elevates the color of the limestone floors in a way I did not expect.  I'm not 100% happy with my fill job though, when the screw holes were on the curved section of the trim, it was a real struggle to get a seamless fill (whos idea was that!?)

I used Farrow and Ball's Railings for the baseboards in the front bedroom (no pictures of that room yet!), this one is a deep blue-black, though it just feels black in there, maybe that will change once the carpet goes in.

I also painted the woodwork going down into the cellar.  Previously the spookiest space in the house, it is now tidied up and a little more welcoming.  I only had enough paint to do the one wall, but after I added new light bulbs, it made a world of difference.  My next job down there will be to get some new shelving.  I need a place to store all these cans of paint!

Finally, I threw paint at the outer garden gate, it is a POS but the paint helps a little and is a step towards the garden not looking abandoned!

In wedding news: We picked up the succulent favors!  They are cute and now I don't want to give them away...

-Nikki

Friday, August 25, 2017

Friday Finds - 1970's Floor Lamp!

Today I want to show off two vintage lamps found a few weeks apart from the same source down by the Maryland Shore.  And I want to pat myself on the back for spotting them and jumping on the opportunity.  I love them so much, the structural, architectural quality is very striking to me. 
I realized they would need to be rewired and refinished completely.  Luckily my dad was just as excited about the find and has been leading the charge on cleaning them up.  
The first lamp is an over sized (taller than me) angle-poise style, this a gold finish, which Toby is helping to model.  It is missing a base and has lots of rust spots.  Both lamps had been stored outside so this is not unexpected.  The anglepoise won't be finished until after it is moved to the UK and rewired correctly.  I'd love to finish it in a copper like this...
Copper Angled Floor Lamp
but in my experience I struggle to achieve the finish I want with metallic spray paints, so I will probably go with a glossy black instead.  
Speaking of a glossy black finish, meet our second vintage lamp, the club lamp,from the 1970's (we think).  It has four arcing lamp arms and a dimmer switch, plus a very heavy base, shaped to fit under a sofa.  

The club lamp was in pretty poor condition, with a lot of rust spots and I disliked the original color (mottled gold, black, and red) so we choose to strip it and refinish.  Some people may see it as sacrilege to have stripped the original finish but it's done now so please keep that to yourself.  When you find your own vintage lamp you can do what you like with it.  Besides in this case it was gross and not for resale, so its only value to me was in how it could fit into our new contemporary space.  
Dad used a mix of chemical paint stripper and sandpaper.  He protected the white enameled surface inside of the shades with tape.  From there it was just about finding the right color with spray paint.  We used a primer to prep the lamp for paint.    
My first instinct was to try a pop of mint green, but unfortunately we hated how it came out.  I think the club lamp looks much more classic in black and it looks great at its new home in Ocean City, MD.  
The perfect reading corner!  Best part is the cost, both lamps came from the same salvage place down on the Easternshore and were less than $50 together.    
 Plus we found it very cool to breath new life into a vintage piece like this.

-Nikki

Sunday, January 15, 2017

DIY Outlet Upgrades!

As promised I have an overview of our process installing new outlets into what we think will be the master bedroom, we are not electricians and this is not a how to guide, always consult a professional.  (We did end up having a proper electrician do the rest of the house and he checked out our work.)
Now that the disclaimer is out of the way... we needed more outlets in the bedroom, and Matt had the brilliant idea to upgrade to a set with USB ports, so we were pretty excited and motivated.  
The upgraded receptacles only cost a few dollars more than the standard and came with installation instructions.
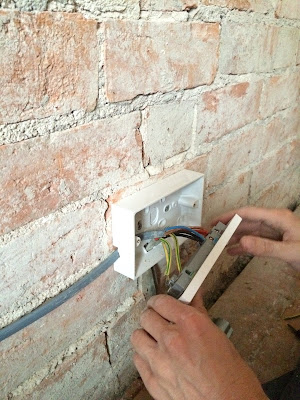
We measured out the size of the bed so that the outlets would go outside of it and got about securing the casing to the brick.  Drilling into the brick was tricky because, in an old house like ours, the bricks are not uniform, some were way to soft and crumbly, others were very very hard, the mortar was to soft as well, so there was some trial and error here.  The first of the two outlets we installed went back in the original space, IE: where the wires were coming up from the floor. 
I threaded the wires (electricity was shut off at this point) into the case and Matt took over attaching the correct wires to our new outlet face as well as separating out the ones which were to go off to the second new outlet.  (See the gray cord going off to the left.)
The second case and cover went faster than the first, though there was some hanky panky using the electric drill to install because to use the drill the power had to be turned on... Do Not Do This! But glossing right over that...
Look how pretty!  And it works!  Our next move was to use this metal strip to secure and cover the wire to the brick, protecting it and us from any reno in the future.  This took forever to get right, but with some good brick anchors for the screws, careful measuring, and pilot holes we got it done.  
Very proud!  This was one of the bigger projects that we've taken on and successfully finished all in one day with no outside help.  When we plastered this room the wire housing was secured further and covered over, the outlets are now nearly flush with the surface of the wall and rock solid.  I'm so glad we made the effort here, we really needed the extra outlets in there and now with the built-in UBS ports we have a plethora of options. 
I should probably pick out some cool bedside lights..
- Nikki

Monday, October 3, 2016

DIY Padded Headboard. -Very simple!


I know I haven't posted in a while, life has been very busy with job changes and traveling, so here is a short one to get back in the groove.  
A room decor project, for the beach condo, completed this summer with some help from my sister, who I might add has been even more busy than I, starting her Ph.d program.  I'd always wanted to try diy padded headboards and used the mismatched existing headboards as an excuse.  The goal was to update them and make them match along with the other decor. 
Finished product first! Bananas for scale!
~
These are the headboards I started with.
I attacked this project just like I was recovering a set of chairs, using some egg-crate mattress pads and left over fabric from the sofa makeover.
We measured and cut the materials to size then stapled on.  This is where my sister Cat was a huge help, taking turns to hold the layers of padding or fabric in place and stapling (and taking photos!). We wanted a smooth front so all the material was cut large enough to reach around to the back of the headboards and was secured there out of sight.  To secure the fabric and padding we used a staple gun (pictured) and a hammer to drive them in properly.

The corners were the only tricky part, but we tried a few folding combos until we achieved a neat look.  
A few hours, and a pizza, later we were finished!
Thats it, now the headboards match and are very comfy to sit up and read against. Next time I would try tufting them by pre-drilling holes in the headboards to string covered buttons to for a more upscale look. 
- Nikki


Wednesday, April 13, 2016

Building a Terrarium - DIY

I love plants, I think every room can be improved by some living color, but I killed the first few plants I ever had.  Basically I over-loved them with too much water, bad planting, and not looking into the basic requirements for their survival.   
One of my worst plant murders was the planting of succulents in a "cutesy" terrarium, this is a popular look right now, but it goes against the natural environment these plants thrive in.  Succulents and cacti prefer low-humidity, more arid conditions, to be deeply watered in the growing season, but left alone when dormant, the opposite of a terrarium.
So after finding a large glass jar with cork lid I started looking for moisture loving, medium light plants.
I used white stones on the bottom and then a clean dust sheet to keep the soil from falling through.

I added a layer of perlite, and a little soil, then pulled out all the tiny plants I'd picked out.  This is the moment I realized that the mini orchid was still way to big, I returned it.  I added soil and figured out the plant arrangement. 
Pretty! 
Once the plants are arranged give it a good watering, this will also help clean the dirt from the sides and leaves.  I let mine sit for a day then popped the cork in.  Ideally these plants will thrive and the only time I'll need to open the jar would be to prune if things get too big.
Finished!
I love terrariums for the rare occasions when I can cheat and open the lid,  the smell inside takes me strait to a lush rain-forest.  Since this was a thrifted jar and tiny plants the whole project cost less than $15.
- Nicole