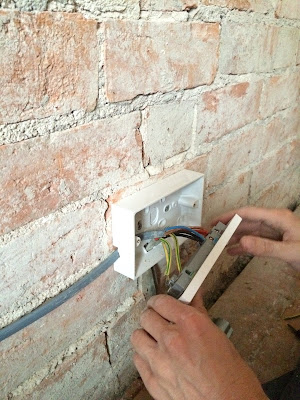
As promised I have an overview of our process installing new outlets into what we think will be the master bedroom, we are not electricians and this is not a how to guide, always consult a professional. (We did end up having a proper electrician do the rest of the house and he checked out our work.)
Now that the disclaimer is out of the way... we needed more outlets in the bedroom, and Matt had the brilliant idea to upgrade to a set with USB ports, so we were pretty excited and motivated.
The upgraded receptacles only cost a few dollars more than the standard and came with installation instructions.
We measured out the size of the bed so that the outlets would go outside of it and got about securing the casing to the brick. Drilling into the brick was tricky because, in an old house like ours, the bricks are not uniform, some were way to soft and crumbly, others were very very hard, the mortar was to soft as well, so there was some trial and error here. The first of the two outlets we installed went back in the original space, IE: where the wires were coming up from the floor.
I threaded the wires (electricity was shut off at this point) into the case and Matt took over attaching the correct wires to our new outlet face as well as separating out the ones which were to go off to the second new outlet. (See the gray cord going off to the left.)
The second case and cover went faster than the first, though there was some hanky panky using the electric drill to install because to use the drill the power had to be turned on... Do Not Do This! But glossing right over that...
Look how pretty! And it works! Our next move was to use this metal strip to secure and cover the wire to the brick, protecting it and us from any reno in the future. This took forever to get right, but with some good brick anchors for the screws, careful measuring, and pilot holes we got it done.
Very proud! This was one of the bigger projects that we've taken on and successfully finished all in one day with no outside help. When we plastered this room the wire housing was secured further and covered over, the outlets are now nearly flush with the surface of the wall and rock solid. I'm so glad we made the effort here, we really needed the extra outlets in there and now with the built-in UBS ports we have a plethora of options.
I should probably pick out some cool bedside lights..
- Nikki


